Published: 14 July 2024
Word Accessibility

Some of my earliest experiences of using a computer were for word processing. I had a ZX Spectrum +3 with a word processing programme that took ages to load. It allowed me to produce my university assignments in print, rather than having to handwrite them. In 1989, I don't think I knew anything about accessibility - physical or digital - but a lot has changed since then.
Now, in 2024, most of us have some kind of digital device and disabled people, including assistive software users, should be able to access Word documents just as easily as everyone else. This post will explain three things that you can do to make your Word document more accessible.
I'll try to explain what to do, why it matters and how to do it. I will try to give instructions for assistive software users too, as I think they get completely forgotten when teaching accessibility.
Images
A well-chosen image can help your audience to engage with your document. Images add interest, give additional information, show what something is like... images are really useful! Have you ever thought though, about people who can't see your image? If a blind person is reading your document, what do they miss out on, when they get to an image? Is it even possible for a blind person to 'read' an image?
Images can be read by screen readers so that blind people can access them, but only if they are added to your document in a way that is accessible.
What do I need to do?
To make images accessible in Word, you need to do two things:
- Give the image alt text (short for alternative text)
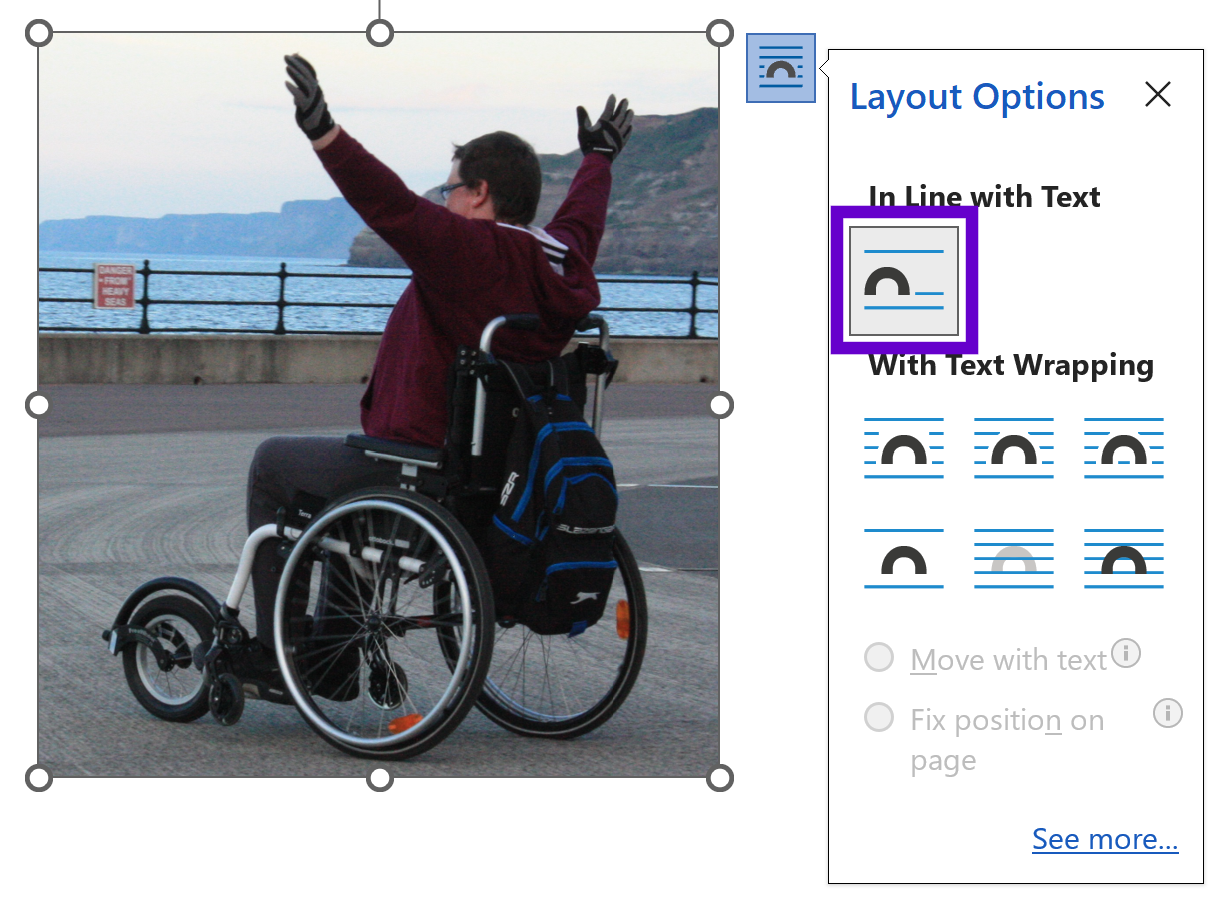
- Keep the image inline with text.
Why does that matter?
A screen reader can read text easily. However, an image can't be simply read out. So what does a screen reader do when it gets to an image? It looks for clues. If there is no alt text, it will try to find something else to read out.
If there is no alt text, it will still announce the presence of an image. It may read the image's file name, e.g. IMG_5376.jpg. It will also read out the dimensions of the image. So now, your blind person knows that there is an image, how big it is (which might indicate its importance) and... and... that's all really. They have no idea what it is.
If an image does have alt text, the screen reader will announce the presence of an image and then read the alt text. That is much better for the user.
In Word, keeping the image inline means not selecting one of the wrapping options. Keeping it inline means that a screen reader will get to it and that the image will be read out at the right time. If you wrap it, maybe to move it around the page, the screen reader might miss it out or read it out in the wrong place.
How do I do that?
No matter how you access your device, the first thing to do is decide what your alt text will say. Your alt text should describe the image. You should keep it brief; it's not War and Peace, but try to include any relevant details.
Don't include information in the alt text that isn't visible in the image. If you need to say where a photo was taken, the alt text is not the place for that. Extra information that everyone needs should be in a caption or in the main text. Alt text is only for screen reader users.
You don't need to say, "Image of..." or "Picture of..." The screen reader will tell the user it is an image (or graphic) so don't waste words repeating this.
Alt text instructions for mouse users
- Right-click on the image.
- Select View Alt Text to open the Alt Text pane.
- Type your alt text into the text box.
- Close the Alt Text pane.

Alt text instructions for keyboard navigators
- Select the image using Shift plus the left or right arrow key.
- Press Alt to enter the menus.
- Press J P to enter the Picture Format ribbon.
- Press A T to open the Alt Text pane.
- Type your alt text into the text box.
- Press Ctrl + Space to open the Task Pane Options.
- Go down three with the arrow keys and press Enter to close the pane.
Alt text instructions for screen reader users
Here is the full audio for this process.
This will now be split to allow you to listen to each instruction individually. No separate transcripts are provided here as the previous transcript provided the instructions.
- Select the image using Shift plus the left or right arrow key. Screen reader may announce the image plus its dimensions.
- Press Alt to enter the menus.
- Press J P to enter the Picture Format ribbon.
- Press A T to open the Alt Text pane.
- Type your alt text into the text box.
- Press Ctrl + Space to open the Task Pane Options.
- Go down three with the arrow keys and press Enter to close the pane.
Alt text instructions for voice recognition users
- Say, "Press shift left," or "Press shift right," to select the image.
- Say, "Click picture format."
- Say, "Click alt text," to open the Alt Text pane.
- Dictate your alt text into the text box.
- Say, "Press control space," to open the Task Pane Options.
- Say, "Go down three, press enter," to close the pane.
Headings
Headings form the structure of a document. In Word, if you create your headings correctly, you can also automatically create a table of contents, which is useful for everyone.
What do I need to do?
To make headings accessible in Word, you need to do three things:
- Make your headings meaningful
- Mark headings up as proper headings (don't just format the text)
- Nest your headings correctly, using the right levels.
Meaningful headings
A heading should tell the reader what the text is going to be about. Headings should be as short as possible but descriptive and clear. You should not use generic headings, such as: Chapter 1, 2, 3; Part 1, 2, 3; Section 1, 2, 3; etc. Look at the headings on this page. They tell you what the text in that section will be about.
Proper headings
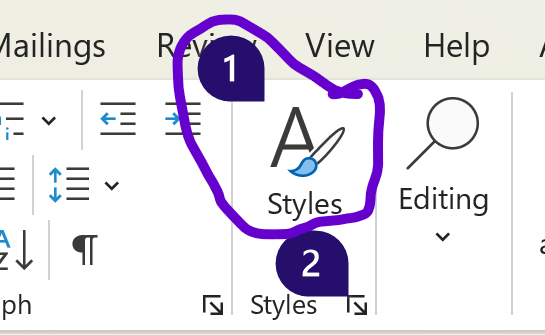
Headings are usually formatted to look different from the normal text. This helps us to spot them easily. However, just making text bigger and bold does not make it a proper heading. On the Home ribbon in Word, there is a Styles section. To mark headings as proper headings, you need to mark it as a heading using one of the heading styles.
Nesting headings
The level of heading is important. In a Word document, the main title of the document should usually be a Heading 1. You may notice a Title style on the ribbon, but don't use this, as it doesn't work with screen readers. Use Heading 1 for the title. Then use Heading 2 for any main headings in your document. If you have subheadings within a Heading 2, you should use Heading 3. If there are sections within those subheadings, you can use Heading 4, and so on.
There are six levels of heading but it is unusual to need Heading 5 and Heading 6. Most documents only need headings at levels 1 to 3.
Why does that matter?
Headings are important for all readers. They help us to make sense of the document. I don't about you, but I rarely read a whole document from start to finish. I use either the table of contents or I skim through and use the headings to decide what I want to read about.
In the same way as sighted people can visually skim through headings, a screen reader user can bring up a list of headings and then jump to the section they want to read about. This only works though, if the headings are created properly. If you just format the text, a screen reader won't recognise it as a heading.
When we visually skim through headings, we subconsciously notice things like the relative size of them. This helps us to determine whether they are main headings or subheadings. A screen reader user also uses this information but instead of seeing the visual appearance, they use the heading level. This helps the reader build up a mental structure for the document.
In the most recent WebAIM survey of screen reader users ![]() , 71.6% of respondents use headings as their first method of finding information. The question related to web pages, but in my experience, the same applies to documents. When asked about using the heading levels, 57% find them very useful and 31.8% find them somewhat useful.
, 71.6% of respondents use headings as their first method of finding information. The question related to web pages, but in my experience, the same applies to documents. When asked about using the heading levels, 57% find them very useful and 31.8% find them somewhat useful.
How do I do that?
This section will explain how to mark a heading correctly in Word. To keep it brief, I will just mark one heading at level 1, but the method is the same for all headings.
Heading instructions for mouse users
- Type your heading.
- Go to the Home ribbon.
- Open the Styles menu.
- Select a heading at the correct level.
Heading instructions for keyboard navigators
- Type your heading.
- Press Alt to display the menu options.
- Press H to go to the Home ribbon.
- Press L to open the Styles options.
- Use the arrow keys to move to the correct heading level.
- Press Enter to apply the heading.
Heading instructions for screen reader users
Here is the full audio for this process.
This will now be split to allow you to listen to each instruction individually. No separate transcripts are provided here as the previous transcript provided the instructions.
- Type your heading.
- Press Alt to enter the menu options.
- Press H to go to the Home ribbon.
- Press L to open the Styles options.
- Use the arrow keys to move to the correct heading level.
- Press Enter to apply the heading.
Heading instructions for voice recognition users
- Dictate your heading.
- Say, "Click Home," to go to the Home ribbon.
- Say, "Click Styles," to open the Styles options. If this results in numbered options, choose the one for the drop-down rather than the pop-out.
- Use direction commands such as, "Go right, go down," until the focus is on the correct heading level.
- Say, "Press enter," to apply the heading.
Links
Links, short for hyperlinks, are really useful in helping readers to access additional content, which is outside the document. This is usually a webpage but it could also be an email address, a different document or even moving to a different place in the same document.
What do I need to do?
To make links accessible in Word, you need to do three things:
- Create it correctly as a link
- Make the display text meaningful and descriptive
- Check the colour contrast against the background and the surrounding text.
Why does that matter?
No matter who is reading your document, it's important that links are recognisable as links. Generally, links are a different colour to the rest of the text or they are underlined, or both. For anyone using a mouse, they can confirm the presence of a link by hovering over it. If it's a link, the pointer turns into a hand. It helps if the contrast is sufficient to tell that it's a link but also still be able to read it.
For assistive software users, it's not that simple. Screen reader users need the text to be announced as a link and to read something meaningful. The link text should tell them where it will go. For example, JAWS could read out, "Link BBC Homepage," and that would be nice and clear.
For users of voice recognition software, the visible appearance is more important. It is also important not to cause confusion by underlining text that is not a link. I have lost count of the number of times I've commanded Dragon or Voice Access to open a link, and been utterly baffled as to why it wouldn't work, only to find that it wasn't a link at all. But without a mouse, how does the reader know?
How do I do that?
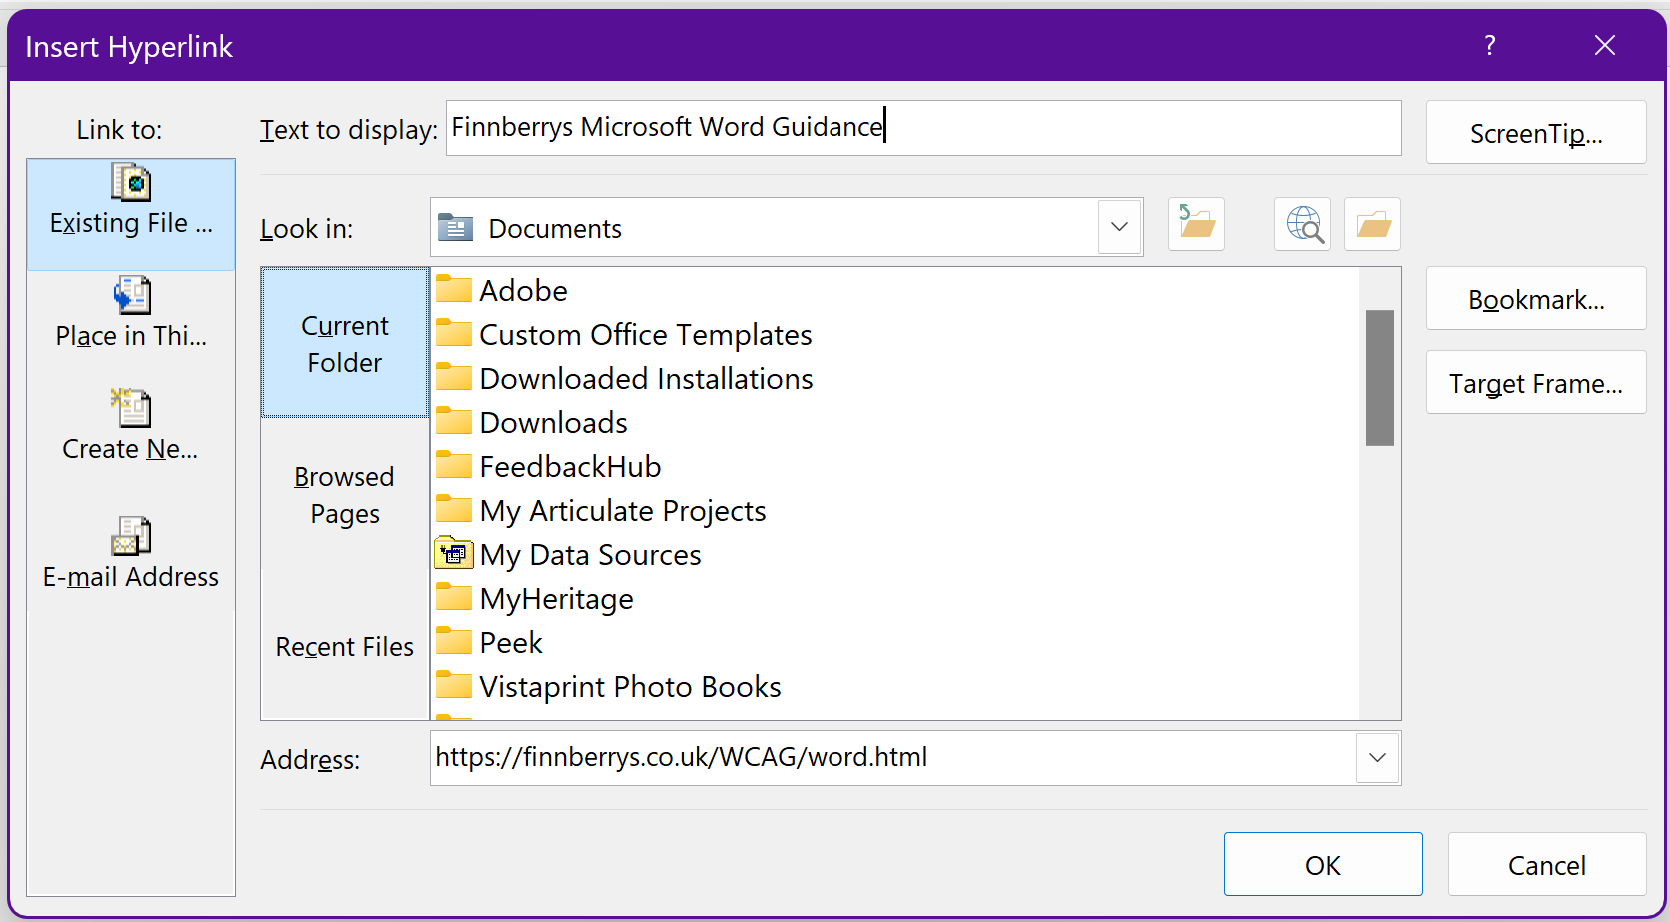
No matter how you access your device, the best way to create a link is through the Insert Hyperlink dialogue box.
Once you've created your link, you can use the WebAIM link contrast checker ![]() , to ensure that the colours are clear enough.
, to ensure that the colours are clear enough.
Link instructions for mouse users
- Put the cursor where you want the link to appear.
- Right-click and select Link.
- Copy and paste the URL (web address) into the Address field.
- Change the text in the Text to Display field and make it meaningful.
- Click OK.
Link instructions for keyboard navigators
- Use the arrow keys to position the cursor where you want the link to appear.
- Press Alt to enter the menus.
- Press N to open the Insert ribbon.
- Press I to open the Link options and I again to open the Hyperlink dialogue box.
- Press and hold Alt and press the Tab key until the web browser is in focus.
- Release the Alt key.
- Press Alt + D to move to the address bar.
- Use Ctrl + C to copy the URL.
- Press and hold Alt and press the Tab key until Word is in focus.
- Release the Alt key.
- Press Ctrl + V to paste the URL into the Address field.
- Press Tab to move to the Text to Display field and type in your meaningful text.
- Press Tab twice to move to the OK button and press Enter
Link instructions for screen reader users
Here is the full audio for this process.
This will now be split to allow you to listen to each instruction individually. No separate transcripts are provided here as the previous transcript provided the instructions.
- Use the arrow keys to position the cursor where you want the link to appear.
- Press Alt to enter the menus.
- Press N to open the Insert ribbon.
- Press I to open the Link options and I again to open the Hyperlink dialogue box.
- Press and hold Alt and press the Tab key until the web browser is in focus and then release the Alt key.
- Press Alt + D to move to the address bar.
- Use Ctrl + C to copy the URL.
- Press and hold Alt and press the Tab key until Word is in focus and then release the Alt key.
- Press Ctrl + V to paste the URL into the Address field.
- Press Tab to move to the Text to Display field and type in your meaningful text.
- Press Tab twice to move to the OK button and press Enter.
Link instructions for voice recognition users
- Say, "Insert after..." to put the cursor where you want the link to appear.
- Say, "Click insert," to open the Insert menu.
- Say, "Click link," to open the Hyperlink dialogue box.
- Say, "Switch to [web browser]," to go to the web page.
- Say, "Press Alt D," to move to the URL bar.
- Say, "Copy that," to copy the URL.
- Say, "Switch to Word," to go back to your document.
- Say, "Paste that," to paste the URL into the Address field.
- Say, "Tab," to move to the Text to Display field and dictate your meaningful text.
- Say, "Click OK."
Summary
The three tips given here will ensure that images, headings and links are accessible in your Word documents. Although these three things are very important, there are some other things you can do to make your whole document accessible. If you want to learn more, why not go through my full Microsoft Word Guidance section? It's full of how-to videos and covers much more than this blog post.